Yay! Four days ago I was frustrated as can be with this one, but I’m happy to report that the quilt is finished and AWESOME! The too short backing problem was easily solved by adding scraps to the ends which wound up looking just fine:
 I would not have liked this one if I hadn’t added the contrasting strips throughout. It could have used a few more slashes, but I was frustrated at the time!
After I basted the quilt, I added a little embroidered note on the back:

This was before I clipped all the little strings. I even remembered to pull the front of the quilt away so that the writing didn’t come through (backwards) on the front of the quilt.
Next came the quilting. I knew that all the colored parts would be quilted and the signature blocks left alone. I also knew that I needed a design that would not call attention to the fact that the back was probably not exactly lined up with the front (though it turned out to be pretty darn close!). I kept shying away from the idea of a meandering stitch because I’m just not very good at it, but after a day of procrastinating, I decided to just go for it. I am SO VERY glad I did. It seems I have finally gotten the hang of it!
On top of that, I debated for a while over what thread color to use and eventually decided to use a turquoise in the bobbin for the back (which I was already using for the (No) Golden Shadows quilt) and something new for the front. Since I really couldn’t find the “right” color, I went with a variegated spool- shades of purple, blue and fuchsia. It is a Sulky brand 40wt. viscose and rayon blend and it is gorgeous! It is silky and shiny and the color changes are perfect for this quilt. I may be upgrading my quilting thread from here on out!
The quilting did bring out one little oops: a popped seam that couldn’t be fixed with a blind stitch (it had popped because there wasn’t enough of a seam allowance). So a few little zigzags in the corner. It isn’t noticeable unless you are looking for it. 
And then finally, the binding. I knew that this one would be machine stitched (I am so DONE with hand stitching binding) and I really didn’t want to buy more fabric. The perfect purple (and just enough of it) presented itself from my stash and the only problem became finding a thread to blend with it since I knew my machine stitching was sure to have a whole bunch of stitches in the binding itself (and it certainly does!).
 So through the thunderstorm I trekked to Joann’s with purple fabric in hand to match up thread colors. Coats and Clark number 3660 was the winner and it blends perfectly! The purple is less blue and more purple-y than the photo shows, for those of you matching up your thread colors at home!
I also tried out my new binding clips. I used them to do both the front and the back of the binding- they were great!
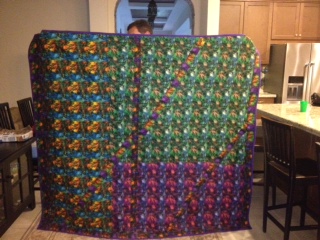
And the finished beauty:
My husband was kind enough to do quilt holding duties. He is about 5’8, so I’m guessing the quilt is a touch over 5 feet. And I promise that the greenish-blue block at the bottom is straight, I’m just a really lousy photographer! Thanks again to Kaye Prince of Miss Print for the fabulous Euclid quilt tutorial.
Now back to (No) Golden Shadows!
-Allison


 When I laid out the four blocks, I realized that the bat block was much shorter than the others, so I made a pair of creepy eyes to add to it:
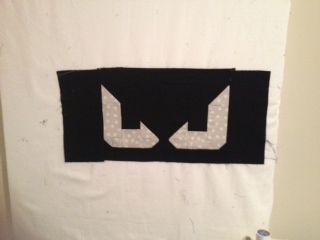 These came from a tutorial from Happy Sew Lucky, called the Eyeballs Quilt Block Tutorial. I haven’t decided if these will get sashing, or how they will be layed out yet. But the goal is to get it done by Halloween, which gives me two more days!

")


")
")
")
 And finally, to give it a little more dimension, instead of using a single solid or low volume background color, I used a variety of off -whites, ranging from grey to beige.
 I’ve started working on some ideas for the back, and will use some left over jelly roll strips and some of the background “whites” for the binding. This one might wind up getting an attempt at some interesting quilting, because really I’m not sure what else to do with it!


")
")
 In between loads of laundry this week (three kids home from sleep-away camp!), I managed to add the sashing to the Modern Block of the Month Quilt. It is now a finished quilt top- YAY!!!! I’m still in love with the Kona silver color. And the Tula Pink Freefall in battleship grey really is the perfect backing. But watch out for shrinkage (at least I hope that is what the problem is). The two yards I ordered wound up being only 67 inches after washing. I hadn’t thought to measure it before hand. Luckily, it was still more than enough, since this is a smaller quilt.


")
")
")
")


")
")
")
")
")
")
")
")
")
